
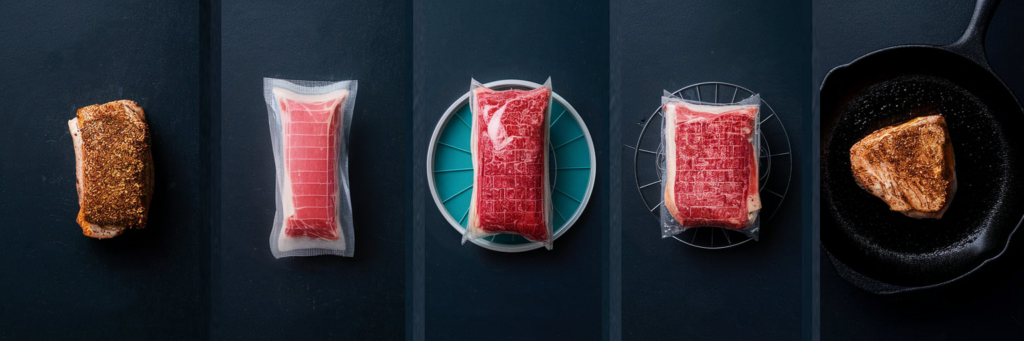
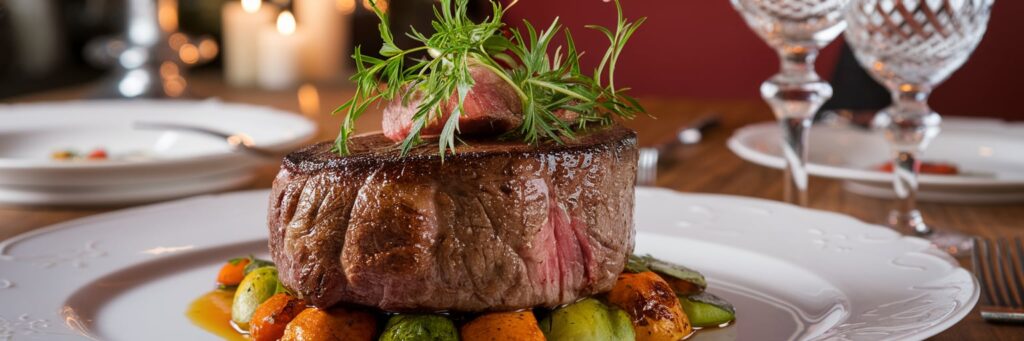
Have you ever wondered how high-end restaurants achieve perfectly cooked steaks, tender chicken, or velvety salmon every single time? The secret lies in a revolutionary cooking technique known as sous vide. Once exclusive to professional chefs, sous vide has now become an accessible method for home cooks looking to elevate their culinary skills and achieve restaurant-quality meals with ease.
Sous vide, which means “under vacuum” in French, involves sealing food in a bag and cooking it in a precisely controlled water bath. This method ensures even cooking, enhances flavor, and preserves moisture, delivering consistently perfect results—something that traditional cooking methods often struggle to achieve.
In this article, we’ll explore everything you need to know about sous vide cooking, from the essential equipment and techniques to cooking times, expert tips, and common mistakes to avoid. Whether you’re a beginner or a seasoned home chef, this guide will help you master sous vide and transform your home cooking into a five-star dining experience.
What is Sous Vide Cooking?
Sous vide (pronounced soo-veed) is a cooking technique that involves sealing food in an airtight bag and immersing it in a precisely controlled water bath. The food is cooked slowly at a consistent, low temperature, ensuring even doneness without overcooking.
How Does Sous Vide Work?
Traditional cooking methods rely on direct heat from a pan, oven, or grill, which can lead to uneven cooking—often resulting in a steak that’s overcooked on the outside and undercooked in the center. In contrast, sous vide allows food to cook at the exact temperature needed for perfect results every time.
For example, if you want a medium-rare steak, you can set the sous vide water bath to 130°F (54°C), and the steak will never exceed that temperature, ensuring ideal doneness from edge to edge.
Why Sous Vide is a Game-Changer
- Precision Control: Achieves the exact level of doneness you desire.
- Consistent Results: Eliminates guesswork, so you never overcook or undercook food.
- Enhanced Flavor and Texture: Food cooks in its own juices, making it more flavorful and tender.
- Hands-Off Cooking: Set it and forget it—no need to constantly monitor.
Sous vide is used by top chefs worldwide, but thanks to modern, affordable sous vide machines, anyone can now enjoy this foolproof cooking method at home.
Essential Equipment for Sous Vide Cooking
To get started with sous vide cooking at home, you’ll need a few key tools. While professional kitchens use high-end sous vide machines, there are now many affordable and user-friendly options available for home cooks.
1. Sous Vide Machine (Immersion Circulator)
The sous vide immersion circulator is the most important piece of equipment. It heats and circulates the water to maintain a precise temperature throughout the cooking process. Popular models include:
- Anova Precision Cooker
- Breville Joule Sous Vide
- Instant Pot Accu Slim
2. Vacuum Sealer and Bags
To cook food sous vide, it needs to be placed in an airtight bag. There are two main sealing options:
- Vacuum Sealer: Removes air and tightly seals food in a plastic bag for better heat transfer. (e.g., FoodSaver Vacuum Sealer)
- Water Displacement Method: If you don’t have a vacuum sealer, you can use a resealable Ziploc bag by slowly lowering it into the water to push out the air before sealing.
3. Water Container
You can use any large pot or heat-resistant plastic container to hold the water bath. Some sous vide brands offer custom containers with lids to minimize water evaporation during long cooking times.
4. Finishing Tools (For Searing)
Since sous vide doesn’t create a crust on meats, you’ll need a finishing step to get that perfect sear:
- Cast Iron Skillet – Great for achieving a golden-brown crust.
- Kitchen Torch – Adds a flame-seared finish (e.g., Bernzomatic Torch).
- Grill or Broiler – Ideal for finishing steaks or fish with a smoky touch.
Optional Accessories:
- Sous Vide Racks: Keep multiple bags separated for even cooking.
- Floating Weights or Clips: Prevent bags from floating to the surface.
By having the right equipment, you can easily bring the sous vide experience into your home kitchen and achieve consistently perfect results every time.
Benefits of Sous Vide Cooking
Sous vide cooking offers numerous advantages that make it a favorite among professional chefs and home cooks alike. From precision control to enhanced flavor, here’s why this method is revolutionizing home cooking.
1. Precision Cooking for Perfect Results
One of the biggest advantages of sous vide is its precise temperature control. Unlike traditional cooking, where heat is applied unevenly, sous vide ensures that food reaches the exact temperature you set—without overcooking or drying out.
Example: If you want a medium-rare steak (130°F/54°C), the steak will never go above that temperature, ensuring a perfect pink center every time.
2. Enhanced Flavor and Texture
Because food is sealed in a bag, it cooks in its own juices, retaining moisture and intensifying natural flavors. There’s no loss of liquid due to evaporation, which means your food remains incredibly juicy and tender.
Example: Chicken breasts cooked sous vide are significantly more tender and juicy compared to traditional pan-frying or baking.
3. Hands-Off, Foolproof Cooking
Sous vide allows for set-it-and-forget-it cooking. Once your food is sealed and placed in the water bath, the machine does all the work—no need to monitor or adjust heat.
Example: You can start cooking dinner, walk away, and come back to perfectly cooked food without any risk of burning or overcooking.
4. Consistency Every Single Time
Unlike traditional cooking methods, where food can be unpredictable, sous vide delivers repeatable, restaurant-quality results.
Example: Every steak you cook will have the same perfect level of doneness, no matter how many times you make it.
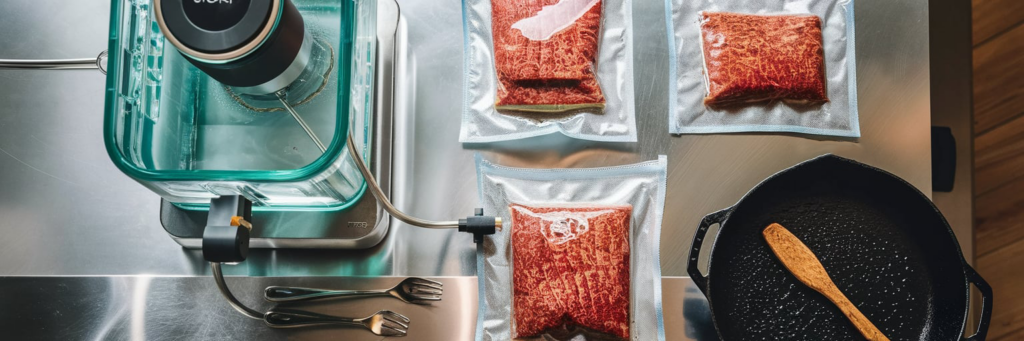
5. Ideal for Meal Prep and Batch Cooking
Sous vide makes it easy to cook in bulk and store food for later. Once food is cooked, you can quickly chill it in an ice bath and refrigerate or freeze it for later use. Simply reheat in the sous vide bath without losing quality.
Example: You can sous vide multiple chicken breasts for the week and just sear them when ready to eat.
6. Versatile for Different Foods
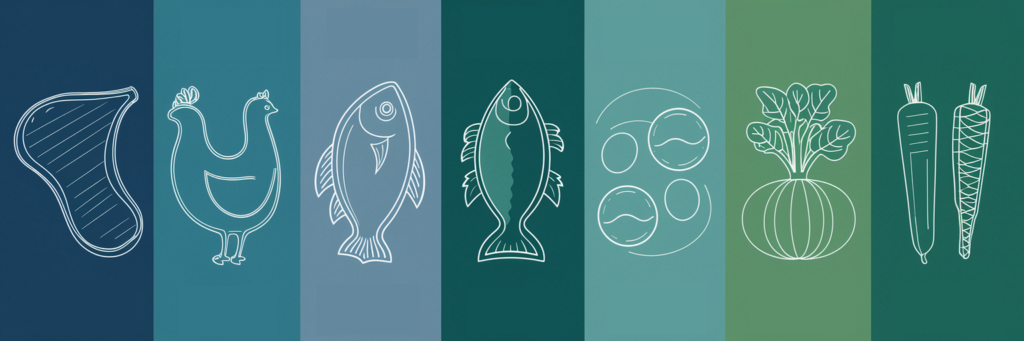
Sous vide isn’t just for steak—it works for a variety of foods:
- Proteins: Steak, chicken, fish, pork, and even eggs.
- Vegetables: Carrots, asparagus, potatoes, and more.
- Desserts & Infusions: Cheesecake, custards, flavored oils, and cocktails.
Why You Should Try Sous Vide Cooking at Home
With its precision, ease, and ability to create consistently perfect meals, sous vide is an essential technique for anyone looking to elevate their home cooking. Whether you’re a beginner or an experienced cook, the benefits of sous vide make it a game-changer in the kitchen.
Step-by-Step Guide to Cooking with Sous Vide
Now that you understand the benefits of sous vide cooking, let’s go through the step-by-step process to help you achieve restaurant-quality results at home.
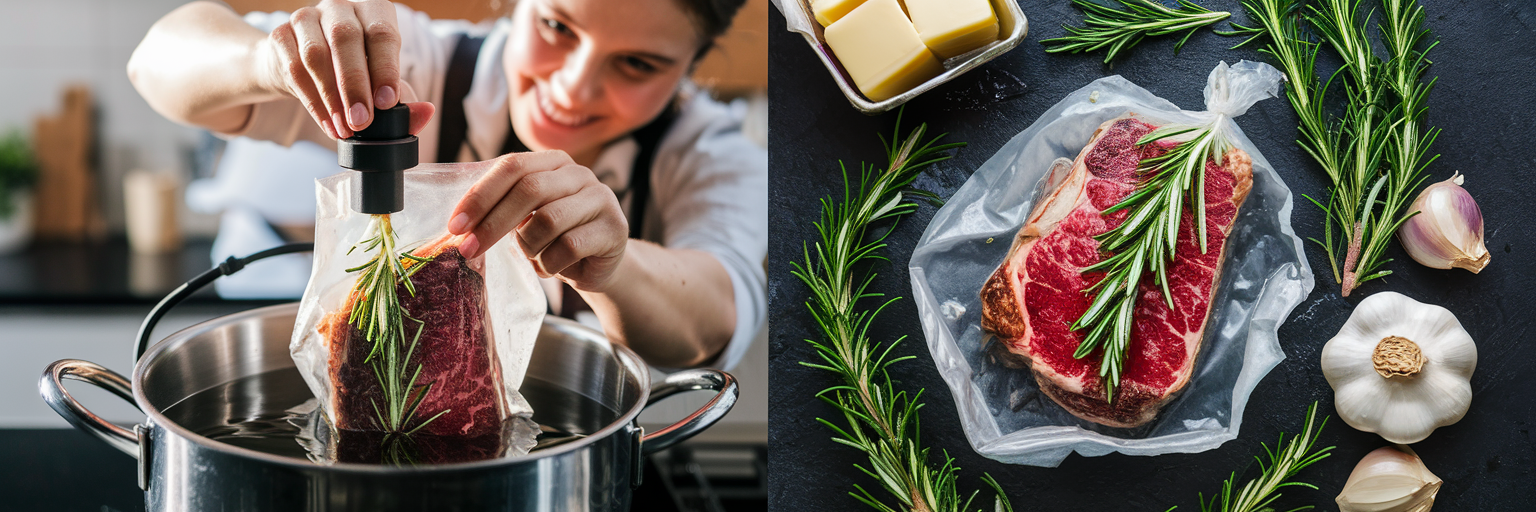
Step 1: Season and Seal the Food
Before placing your food in the sous vide water bath, you need to season and seal it properly.
Seasoning:
- Keep it simple with salt, pepper, and herbs (e.g., rosemary, thyme, or garlic).
- You can also marinate proteins or add butter and aromatics for extra flavor.
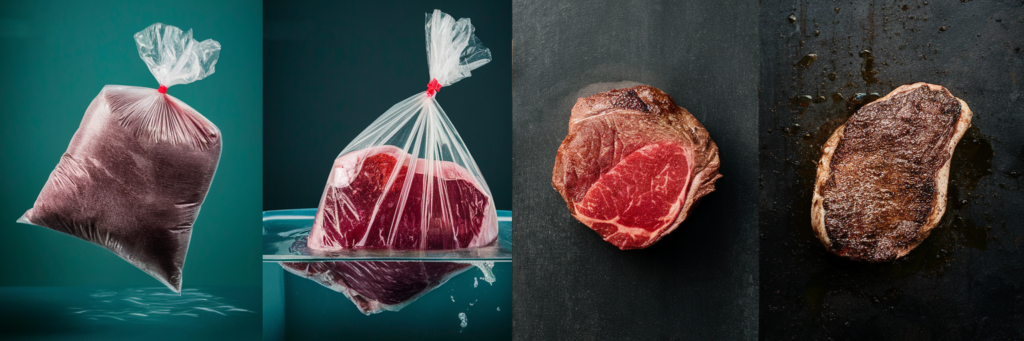
Sealing the Food:
- Vacuum Sealer (Recommended): Removes air completely for better heat transfer.
- Ziploc Bag (Water Displacement Method): Place food in the bag, lower it into water to push air out, then seal.
Step 2: Preheat the Water Bath
- Attach your sous vide immersion circulator to a large pot or water container.
- Set the temperature based on what you’re cooking. Here are a few examples:
| Food | Temperature | Time |
| Steak (Medium-Rare) | 130°F (54°C) | 1-4 hours |
| Chicken Breast | 145°F (63°C) | 1.5-4 hours |
| Salmon | 125°F (52°C) | 30-45 minutes |
| Eggs (Soft-Boiled) | 167°F (75°C) | 13 minutes |
| Carrots | 183°F (84°C) | 1 hour |
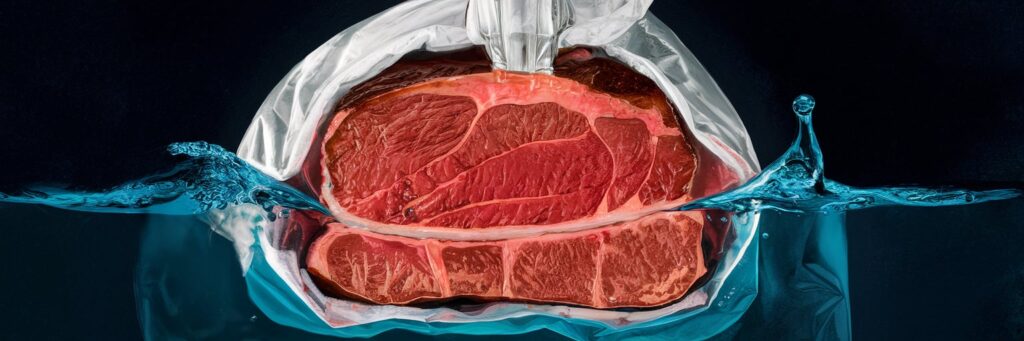
Step 3: Submerge and Cook
- Once the water reaches the correct temperature, submerge the sealed food in the water bath.
- Use clips or weights to keep the bag from floating.
- Let it cook for the recommended time—longer times for tougher meats help break down connective tissue for maximum tenderness.
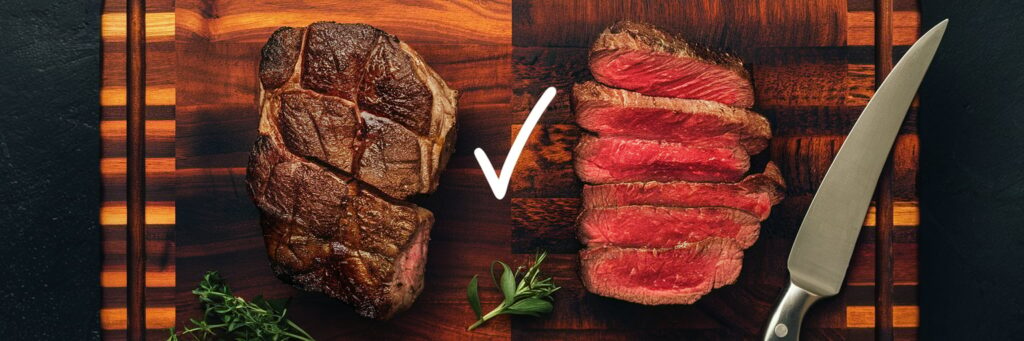
Step 4: Finish with a Sear (For Meat and Fish)
Since sous vide doesn’t brown food, you need a final step to develop a crispy, flavorful crust.
Best Searing Methods:
- Cast Iron Skillet: Heat with high smoke point oil (e.g., avocado oil), then sear for 30-60 seconds per side.
- Kitchen Torch: Adds a smoky, flame-seared finish.
- Grill or Broiler: Quickly char the surface for extra texture.
Tip: Pat the food dry with paper towels before searing—this helps achieve a better crust!
Step 5: Serve and Enjoy!
- Once seared, your food is ready to serve!
- Pair your steak with mashed potatoes, chicken with roasted vegetables, or fish with lemon butter sauce for a gourmet experience.
Bonus: Storing and Reheating Sous Vide Food
Sous vide is great for meal prep!
- Store in the fridge (up to 5 days) or freeze for later use.
- Reheat sous vide by placing food back in a water bath at 10-15°F below the original cooking temp.
Sous Vide Cooking Times & Temperatures Guide
One of the biggest advantages of sous vide cooking is the precise temperature control that allows you to achieve perfect doneness for any food. Below is a detailed guide to cooking times and temperatures for different ingredients.
1. Meat and Poultry
| Food | Preferred Doneness | Temperature | Time |
| Steak (Rare) | Cool red center | 120°F (49°C) | 1-2.5 hrs |
| Steak (Medium-Rare) | Warm red center | 130°F (54°C) | 1-4 hrs |
| Steak (Medium) | Warm pink center | 140°F (60°C) | 1-4 hrs |
| Steak (Well Done) | No pink, firm | 160°F (71°C) | 1-3 hrs |
| Chicken Breast | Juicy, tender | 145°F (63°C) | 1.5-4 hrs |
| Chicken Thighs | Extra tender | 165°F (74°C) | 1-4 hrs |
| Pork Chops (Tender, Slightly Pink) | Juicy | 140°F (60°C) | 1-4 hrs |
| Lamb Chops (Medium-Rare) | Tender | 131°F (55°C) | 1-4 hrs |
| Turkey Breast | Moist and tender | 150°F (65°C) | 2-5 hrs |
Tip: For meats like brisket and short ribs, longer cooking times (24-48 hours) at low temperatures (around 155°F/68°C) break down tough fibers for incredibly tender results.
2. Fish and Seafood
| Food | Preferred Texture | Temperature | Time |
| Salmon (Soft & Tender) | Silky, moist | 120°F (49°C) | 30-45 min |
| Salmon (Firm, Flaky) | Traditional texture | 130°F (54°C) | 45 min |
| Shrimp | Juicy, tender | 140°F (60°C) | 30 min |
| Lobster Tail | Buttery texture | 140°F (60°C) | 45 min |
| Scallops | Perfectly cooked | 123°F (51°C) | 30 min |
Tip: Avoid overcooking seafood; lower temperatures ensure a soft, delicate texture.
3. Eggs (Precision Cooking)
| Egg Type | Texture | Temperature | Time |
| Soft-Boiled (Runny Yolk, Set Whites) | Creamy yolk | 145°F (63°C) | 45 min |
| Medium-Boiled (Jammy Yolk) | Slightly firm yolk | 167°F (75°C) | 13 min |
| Hard-Boiled (Fully Set Yolk) | Classic boiled egg | 170°F (77°C) | 13 min |
| Poached Eggs | Soft whites, runny yolk | 167°F (75°C) | 13 min |
Tip: Sous vide eggs are perfect for breakfast prep, ramen, and eggs benedict!
4. Vegetables
| Food | Best Texture | Temperature | Time |
| Carrots | Tender, sweet | 183°F (84°C) | 1 hr |
| Asparagus | Crisp-tender | 180°F (82°C) | 10-15 min |
| Potatoes | Creamy, soft | 194°F (90°C) | 1-2 hrs |
| Corn on the Cob | Juicy, flavorful | 185°F (85°C) | 30 min |
| Mushrooms | Rich, deep flavor | 185°F (85°C) | 30-45 min |
Tip: Toss vegetables with butter, olive oil, or herbs before sealing for extra flavor.
5. Sous Vide Desserts & Infusions
| Food | Result | Temperature | Time |
| Crème Brûlée | Silky custard | 176°F (80°C) | 1 hr |
| Cheesecake | Creamy, dense | 176°F (80°C) | 1 hr |
| Cocktail Infusions (Vodka, Gin, Whiskey) | Intensified flavors | 135°F (57°C) | 2 hrs |
Tip: Sous vide is perfect for flavor-infused alcohol, yogurt, and homemade syrups!
By following this temperature and time guide, you can confidently cook anything sous vide and achieve flawless results every time.
Common Sous Vide Mistakes and How to Avoid Them
While sous vide is a relatively simple and foolproof cooking method, there are a few common mistakes that can impact the quality of your food. Here’s what to watch out for and how to fix them.
1. Not Sealing the Bag Properly
Problem: If air remains in the bag, it can cause uneven cooking or make the bag float in the water bath.
Solution:
- Use a vacuum sealer to remove all air.
- If using a Ziploc bag, use the water displacement method—slowly lower the bag into the water to push out air before sealing it.
- Weigh the bag down with a spoon or sous vide weights to prevent floating.
2. Cooking at the Wrong Temperature
Problem: Using the wrong temperature can lead to overcooked or undercooked food.
Solution:
- Always double-check the recommended temperatures and times (see previous section).
- Use a calibrated sous vide machine for accuracy.
3. Skipping the Searing Step
Problem: Sous vide meats may come out looking pale and unappetizing if you don’t finish them with a high-heat sear.
Solution:
- Pat the food dry with paper towels before searing to avoid steam.
- Use a hot cast iron skillet, grill, or kitchen torch for a quick 30-60 second sear per side.
- Add high smoke point oil (e.g., avocado oil) to prevent burning.
4. Overcooking in the Water Bath
Problem: Leaving food in the sous vide bath too long won’t burn it, but it can affect texture. For example, steak might become mushy if left in for too many hours.
Solution:
- Follow the time guidelines (e.g., steak should not be in the bath for more than 4 hours).
- For long cooks (e.g., brisket or short ribs), stick to recommended 24-48 hour times.
5. Not Using an Ice Bath for Meal Prep
Problem: If you cook food ahead of time but don’t chill it properly, bacteria can grow during storage.
Solution:
- Use an ice bath (a large bowl of ice and water) for 5-10 minutes after cooking if you plan to store food in the fridge or freezer.
- This cools food quickly and prevents bacterial growth.
6. Using Poor-Quality Ingredients
Problem: Because sous vide enhances flavors, low-quality ingredients (e.g., cheap meats, old seafood) will result in bland or unappetizing dishes.
Solution:
- Use fresh, high-quality ingredients whenever possible.
- Add simple herbs, butter, garlic, or citrus for extra flavor.
7. Forgetting to Preheat the Water
Problem: If you add food before the water reaches the correct temperature, it may cook unevenly or take longer.
Solution:
- Always preheat the water bath before adding your food.
- Use the sous vide machine’s built-in timer to track cooking times accurately.
8. Not Experimenting with Flavors
Problem: Cooking sous vide with just salt and pepper can miss out on flavor opportunities.
Solution:
- Experiment with marinades, aromatics (garlic, rosemary, thyme), or infused oils.
- Try different finishing methods, such as grilling after sous vide for a smoky flavor.
Final Thoughts
Avoiding these common mistakes will ensure perfect sous vide meals every time. With proper sealing, correct temperature, and good finishing techniques, you’ll be able to cook like a professional chef at home.
Advanced Tips for Perfect Sous Vide Cooking
Once you’ve mastered the basics, you can take your sous vide cooking to the next level with these expert techniques and hacks. These tips will help you enhance flavor, improve efficiency, and elevate your home-cooked meals to restaurant quality.
1. Use Aromatics and Butter for Maximum Flavor
Tip: Adding herbs, garlic, citrus, or butter to your vacuum-sealed bag can infuse food with deeper flavors.
Examples:
- Steak: Add thyme, rosemary, garlic, and a tablespoon of butter for a rich, aromatic flavor.
- Salmon: Add lemon slices, dill, and olive oil for a fresh, bright taste.
- Chicken: Use a marinade with soy sauce, honey, and ginger for an Asian-inspired twist.
Pro Tip: Use clarified butter (ghee) instead of regular butter to avoid milk solids burning during searing.
2. Double Bag for Extra Protection
Tip: When cooking for long periods (12+ hours), use a second vacuum-sealed bag to prevent leaks.
This is especially useful for:
- Tough meats like brisket, pork shoulder, or short ribs that require 24-48 hours of cooking.
- Foods with sharp edges (like bones) that might puncture the bag.
3. Chill and Sear Later for Meal Prep Efficiency
Tip: For perfectly cooked steak without stress, cook sous vide ahead of time, chill in an ice bath, and sear when ready to serve.
How to do it:
- After sous vide cooking, place the bag in an ice bath for 5-10 minutes.
- Store in the fridge for up to 5 days or freeze for later use.
- When ready to eat, sear in a hot pan or torch to bring back the crust.
Why it works: This technique helps you prepare meals in advance and still enjoy fresh, perfectly cooked food.
4. Experiment with Different Finishing Methods
Tip: Instead of just using a cast iron pan, try different searing techniques to create unique flavors.
Options:
- Grill: Adds a smoky, charred flavor—perfect for steak and chicken.
- Kitchen Torch: Great for caramelizing steak edges or adding a crispy crust to fish.
- Deep Frying: Works well for crispy sous vide pork belly or chicken wings.
Pro Tip: If using a kitchen torch, hold it 2-3 inches away to prevent burning.
5. Use Sous Vide for Infusions and Drinks
Tip: Sous vide isn’t just for food—you can make cocktail infusions, flavored oils, and even yogurt.
Ideas to Try:
- Cocktail Infusions: Infuse vodka, gin, or whiskey with fruit or spices at 135°F (57°C) for 2 hours.
- Homemade Vanilla Extract: Place vanilla beans in alcohol and sous vide at 135°F (57°C) for 3 hours.
- Olive Oil Infusions: Add garlic, chili, or herbs to olive oil and sous vide at 131°F (55°C) for 2 hours.
Pro Tip: Sous vide speeds up the infusion process 10x faster than traditional methods.
6. Master the Water Displacement Method for Easy Sealing
Tip: If you don’t have a vacuum sealer, use the water displacement method with a regular Ziploc bag.
How to do it:
- Place food inside the bag and seal almost all the way.
- Slowly lower the bag into water—letting the pressure push air out.
- Once most of the air is gone, seal the bag completely and submerge.
Why it works: This method creates an almost airtight seal without needing a vacuum sealer!
7. Optimize Water Circulation for Even Cooking
Tip: Keep bags from touching each other in the water bath for better heat circulation.
How to do it:
- Use sous vide racks to separate multiple bags.
- Clip bags to the side of the pot or container so they don’t float.
- Add a small metal spoon inside the bag to weigh it down.
Why it works: Better circulation = even cooking and perfect doneness.
8. Sous Vide for Perfect Cheese and Desserts
Tip: You can make silky smooth custards, cheesecakes, and even ricotta cheese using sous vide!
Try These:
- Crème Brûlée: Cook at 176°F (80°C) for 1 hour, then chill and caramelize the top.
- Cheesecake: Cook at 176°F (80°C) for 1 hour for a creamy texture without cracks.
- Homemade Ricotta Cheese: Heat milk at 185°F (85°C) and add lemon juice for instant ricotta.
Why it works: Sous vide provides precise temperature control, preventing curdling and overcooking.
9. Try Reverse Searing for Thicker Cuts of Meat
Tip: For thick steaks (2 inches or more), a reverse sear can enhance texture and flavor.
How to do it:
- Cook the steak sous vide at your preferred doneness temperature.
- After chilling, sear the steak in a cast iron pan over high heat for 1-2 minutes per side.
- Let it rest for a few minutes before slicing.
Why it works: This method locks in juiciness while giving you a crispy, restaurant-quality crust.
10. Use Ice Baths for Quick Temperature Adjustments
Tip: If you accidentally cook something at a higher temperature than needed, an ice bath can stop the cooking process immediately.
How to do it:
- Fill a large bowl with ice and water.
- Submerge the sealed bag for 5-10 minutes to quickly cool it down.
- Store or reheat later as needed.
Why it works: Prevents overcooking and keeps food at optimal texture.
Final Thoughts
By using these advanced sous vide techniques, you can refine your cooking skills and experiment with new flavors and methods. Whether you’re preparing a simple weeknight dinner or a gourmet meal for guests, these pro tips will help you achieve the perfect sous vide experience every time!
Conclusion: Elevate Your Home Cooking with Sous Vide
Sous vide cooking is more than just a trend—it’s a revolutionary method that allows home cooks to achieve restaurant-quality meals with precision, ease, and consistency. Whether you’re cooking a perfectly tender steak, juicy chicken breast, delicate fish, or even creamy desserts, sous vide takes the guesswork out of cooking and guarantees flawless results every time.
By following this guide, you now have the knowledge to:
- Understand sous vide cooking and its benefits
- Use the right equipment for the best experience
- Follow precise temperature and time charts for perfect doneness
- Avoid common mistakes and troubleshoot like a pro
- Master advanced techniques to enhance flavors and textures
The beauty of sous vide is that it works for everyone—whether you’re a beginner looking to simplify meal prep or an experienced home chef aiming to refine your skills. Once you start using sous vide, you’ll find it hard to go back to traditional cooking methods!
Ready to Get Started?
- Choose a simple sous vide recipe (steak, chicken, or eggs are great starters).
- Set up your sous vide equipment and prepare your ingredients.
- Experiment with seasonings, marinades, and finishing techniques.
- Enjoy consistently perfect meals with minimal effort!
If you’re looking for recipe inspiration, troubleshooting tips, or more advanced sous vide techniques, keep exploring and refining your craft. Happy cooking!


We’d love to hear from you! Share your thoughts, comments, and feedback with us, we’re always looking to improve and grow. Let us know what you think!